

How to Use MacBook Migration Assistant to Transfer Files
No need to transfer files one by one.

Products and services mentioned on our websites are independently selected by our editors. If you buy something through our links, Summit Media may earn an affiliate commission at no extra cost to you.
(SPOT.ph) Tech giant Apple has finally unveiled the latest MacBook M3 series with its most powerful processor to date. They also permanently slashed the prices on their MacBook Air M2 units, and it's safe to assume the older yet equally mighty M1 units will go on sale, too. Laptops can last for years, but if you've been meaning to get a new one, now would be the best time with all the discounts and promos on older models that are still just as good. The only hassle—aside from cost—would be having to transfer the files you've amassed over the years from your old MacBook to the new one. Enter Migration Assistant.
Also read:
The Apple MacBook Air Just Got Upgraded With an M3 Chip
Beyond the Box Drops Price for the MacBook Air M2
What is Migration Assistant for MacBook?
Simply put, it's a lot like transferring files from an old iPhone unit to a new one. Should you choose to restore files and data from an older model, the new iPhone unit will readily accept all your settings, data, photos, and even your lock and home screens. For MacBook, the Migration Assistant does something pretty similar, and it's built into every one of Apple's laptops.
Instead of manually transferring each photo and file one by one, or re-downloading all your apps and logging into each one, the iPhone restore function let's you move all your stuff into a new house sans the hassle. Migration Assistant for laptops will take all your internal stuff a.k.a files and software from an older laptop and plug in everything into a new unit.
While some delight in configuring a new laptop, others can't afford to lose time or have their important files stuck elsewhere. And just in case you're paranoid and want to keep all the files and whatnot on the old unit, you can choose to migrate your stuff to the new unit and retain all the same stuff on your former companion.
Where do I find Migration Assistant on my Macbook?
On both the old and new MacBook, open Finder, go to Applications, open the Utilities folder, then double-click Migration Assistant and follow the onscreen instructions.
Some things to do before migrating files
If possible, update the software on both computers to the latest version.
Wireless transfers can only be done if both computers have Wi-Fi turned and are near each other. If any unit is running on OS X El Capitan or earlier, the units should also be on the same Wi-Fi network.
Safety is always first, but you're going to have to dial back on the security for a bit. Turn off any antivirus software, firewall software, or VPN softwar until you're done.
Transfer of files using via wired connection like Ethernet or USB-C cable is also possible. If both MacBooks units have a USB-C port, you can use a USB-C cable to transfer files using Migration Assistant. By default, MacBooks will migrate files using Wi-Fi, but you can also opt for a wired transfer for a more secure and stable migration.
How to use Migration Assistant
Stay with us here, because you'll have to jump between your old and new MacBooks to make this a seamless transfer. We've indicated if you need to the certain step on your old or new MacBook. Take your time!
On your new MacBook
When Migration Assistant asks for permission to make changes, enter your administrator password, then click OK.
From this point, you'll be asked how you want to transfer information. Select the option to transfer from a Mac, Time Machine backup, or startup disk.

On your old MacBook
Open Migration Assistant on your old MacBook then click Continue. When asked how you want to transfer your files, select the option to transfer to another Mac, then click Continue.
On your new MacBook
Click transfer from a Mac, then click Continue.

On your old MacBook
Once you see a security code, make sure that it's the same code shown on your new Mac. Then click Continue.
On your new MacBook
Migration Assistant will show a rundown of all of the content on your old MacBook and computes how much storage is taken up by apps, user accounts files, folders, and settings. This part can take a while, but once ready, all you have to do is select the information you want to transfer.
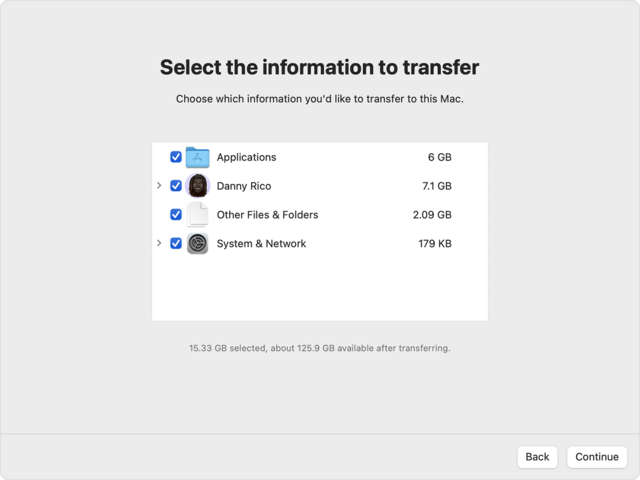
Before you click Continue, know what it means to transfer a user account. In the example used on the Apple website, Danny Rico is a user account on the old MacBook. If an account on the new MacBook has the same name, Migration Assistant asks whether to rename or replace:
- Rename: The account on your old Mac will appear as an additional user on your new Mac, with a separate login and home folder.
- Replace: The account on your old Mac will replace the identically named account on your new Mac.
How long does Migration Assistant take?
Length of time varies depending on the size of the files, how many files you have, and the speed of your Wi-Fi connection, if you choose to do it wirelessly. You can also opt to connect your MacBook using a cable. Overall, it can take anywhere from a few minutes, up to a few hours.
Manage expectations. Larger transfers can take hours to complete, and might seem to pause occasionally. According to Apple, it's best to start in the evening and allow migration to complete overnight. Click Continue to start the transfer.
Once Migration Assistant is done, quit the app on both units, then log in to the account on your new MacBook to check the files.
Now that you know how to transfer files, it's time to let you know that the 13-inch MacBook Air M1 is on sale on Lazada and Shopee, along with the 13-inch MacBook Air M2 which is now on sale forever.
Links are updated regularly and as much as possible but note that products can run out of stock, discounts can expire, and listed prices can change without prior notice.
For more discounts and deals, check out Spot's exclusive vouchers.